


Add channels to your Roku streaming device
With Roku streaming device or Roku TV one can easily add Channels from the ROKU Channel Store. The functioning is same as that of any Android device which consists of play store where downloading of the channels can easily be done. Users will have to recharge or pay the desired price for the Channel while there are many channels which are also available free of cost. There are three different modes through which users can add channels in their device. One is adding channels through the Roku device, the other one is from the web and the last one is through Roku mobile device. Users can find the detailed step by step procedure for each of the modes just below.
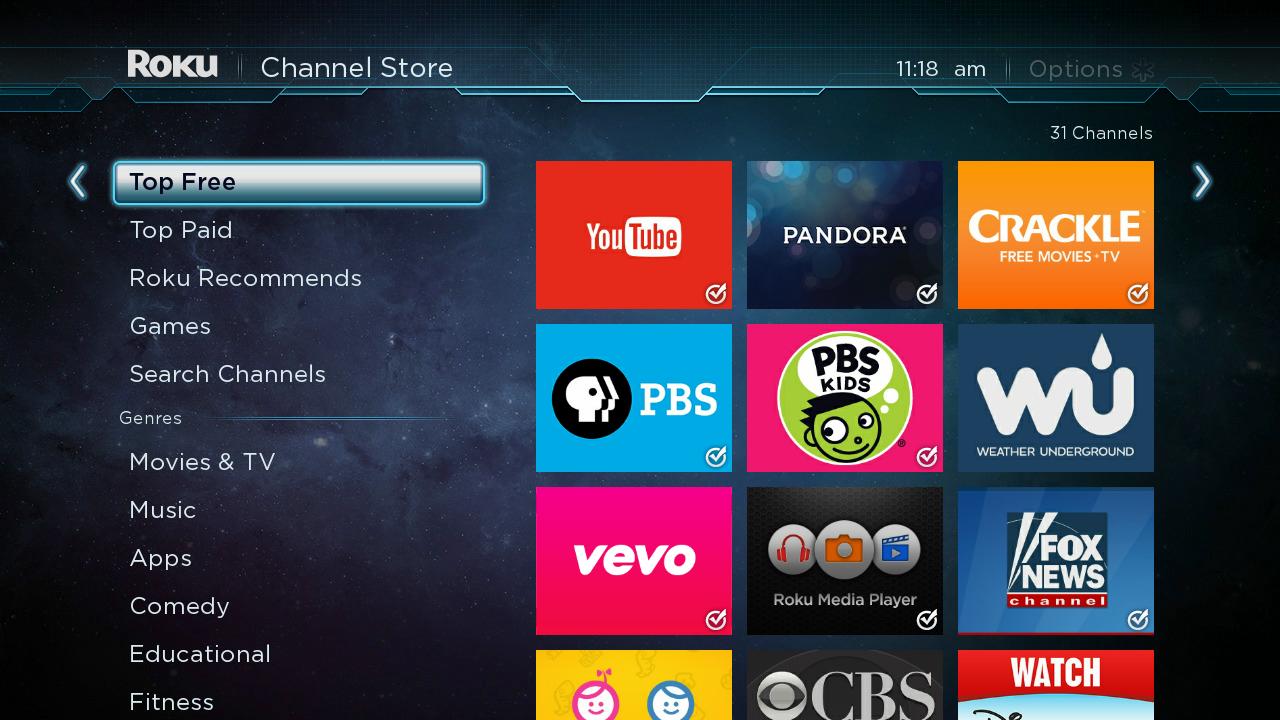
Steps to add Channels from Roku streaming device:
Step 1: Users can start with pressing the home button in their Roku remote
Step 2:- And then they can simply scroll up and down to select the streaming Channels in order to open the Channel store.
Step 3:- Press the Reverse scan button to reverse scan button << or Forward scan button >>forward scan button on your Roku remote
Step 2: Users can next press the OK button in order to get the details of the Channel which could be either free or paid.
Step 3: If the Channel is free then users can simply select Add Channel so that the Channel is available in the device and if its’ paid then users will need to select buy in order to add the channel in the device.
Step 4: Finally users will have to enter the pin in order to ensure that the Channel is installed in an effective manner and users can then find the list of Channels under the Home Screen.
Steps to add Channels to the web:
As stated earlier there are three different ways to which users can add Channels. Users who have access to the web can follow this path to add Channels in the device. They can simply move down the tutorial and follow the below-mentioned step by step procedure to get the issue resolved on an instant basis. In case of any sort of technical doubts, users can feel free to consult the immensely qualified and skilled technicians. They are available all the time which means users can feel free to consult at any point of time without any sort of hesitation.
Step 1: Users can firstly start by clicking on this link channelstore.roku.com as this will directly take the users to the channel store.
Step 2: When the page has opened successfully then users can simply select My account and from there they can sign in to their Roku account.
Step 3: Users can their get a search option through which they can locate and find the channel of their choice.
Step 4: Users can next press the OK button in order to get the details of the Channel which could be either free or paid.
Step 5: Users can finally follow the on-screen instructions to complete the addition of Channel in the device and enjoy uninterrupted streaming service.
Users should note down that the channel which they have purchased will not appear immediately on the device. It takes up to 24 hours for the entire process to happen. In case if you are in any sort of urgency then users can simply
Go to their Roku device and from there they can select Settings followed by System, System Update and then finally on Check Now. In case of any further doubts, users can feel free to consult the certified technicians and get their issue or error resolved on an instant basis. They will definitely offer assistance.
Steps to add Channels from the Mobile app:
The third and the last method through which the users can add Channels are through the mobile app. In order to add Channel through the mobile app users will first need to install the Roku mobile app in their respective device and once that is done then they can simply move down the tutorial and follow the below-mentioned step by step procedure. In case of any sort of technical doubts, users can feel free to consult the immensely qualified and skilled technicians. They are available all the time which means users can feel free to consult at any point of time without any sort of hesitation.
Step 1: Users can start with launching their ROKU mobile app and then tapping on the Channels icon from the navigation bar.
Step 2: The Channels tab will appear next in which users can select Channel store which is available at the top menu.
Step 3: Users can their get a search option through which they can locate and find the channel of their choice.
Step 4: Users can next press the OK button in order to get the details of the Channel which could be either free or paid.
Step 5: Once the above-mentioned step has been executed in an effective manner then users can simply tap on Add Channel and then follow the on-screen instructions to add or purchase the channel, theme or screensaver.
Step 6: Finally users will have to enter the pin in order to ensure that the Channel is installed in an effective manner and users can then find the list of Channels under the Home Screen.
Users should note down that the channel which they have purchased will not appear immediately on the device. It takes up to 24 hours for the entire process to happen. In case if you are in any sort of urgency then users can simply go to their Roku device and from there they can select Settings followed by System, System Update and then finally on Check Now.
In case of any further doubts, users can feel free to consult the certified Roku customer support technicians and get their issue or error resolved on an instant basis. They will definitely offer assistance. Assistance from the certified technicians can be offered to the users either by remote assistance or from onsite assistance or live chatting and mail support. It all depends on the location and availability of the technicians the choice of mode that can be offered to the users at that point in time.